Easy AR 2.0
Easy AR 2.0
EasyAR Documentation
Introduction
Features in Easy AR 2.0
Single placement
Vertical placement
Horizontal placement
Multiple placement
AR Measurement
AR Tilling
Bonus
AR Water pump
AR Pizza
AR Portal
Import Easy AR package in to Unity
Unity version
AR Foundation version
AR Core version
AR Kit version
Setting up the default scene
Build the Application
Setting up a custom scenes
How to set up the Single Object Placement
How to set up the Multiple Object Placement
How to set up the AR Measurement
How to set up the Tilling
Shadow map generation
Introduction
Easy AR is a unity package which allows you to set up your own custom model easily & experience Augmented Reality in real world & also Easy AR 2.0 introduces three new demonstrations which are AR Measurement, AR tilling & AR multiple placement directly you can use them to get better AR experience on your mobile devices. Easy AR 2.0 builds on top of AR foundation in unity, so users are able to build apps on both android & ios also.
Features in Easy AR 2.0
New 3 utility scenes (AR Measurement Utilities, AR Tilling Utilities & Multiple placement Utilities
3 Bonus configurable utility scenes (AR Roadside Water Pump, AR Pizza, AR Portal).
Baked contact shadows
Automatic lights & reflections
Automatic object placement
Object manipulations with touch gestures(Scaling, Rotating and Positioning)
No coding skills needed
Customizable scenes with full user guide
Supported both iOS and Android platforms
Easy AR 2.0 introduces a new UI for the main menu due to enhancement of feature demo. Each & every feature demos explained below in detail.
2.1. Single Object Placement
As you can see, the first segment of Easy AR 2.0 is, single object placement divided into two. Those are vertical object placement (clock) & Horizontal object placement (chair).
2.1.1. Vertical placement
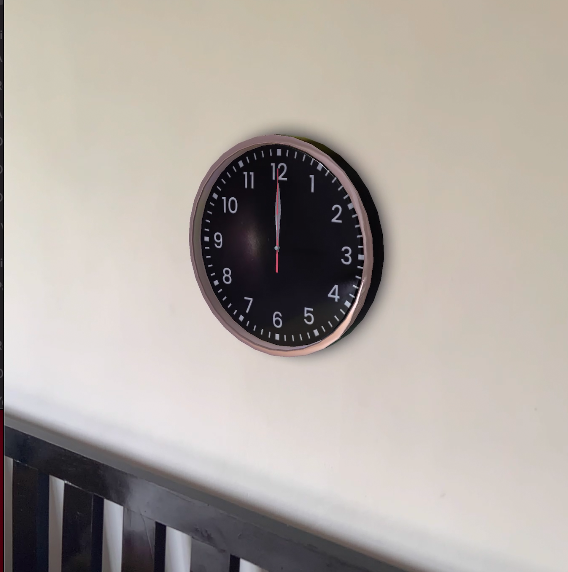
The objects that are placed in vertical space such as clock, wall paintings can be experienced from this feature. For example, here it uses a clock to place on the wall.
2.1.2. Horizontal Placement
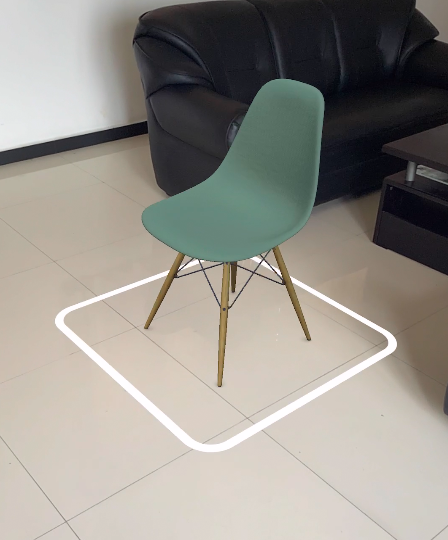
The objects that are placed in horizontal space can be experienced using horizontal placement. For example, the green chair is added here.
2.2. Multiple object placement
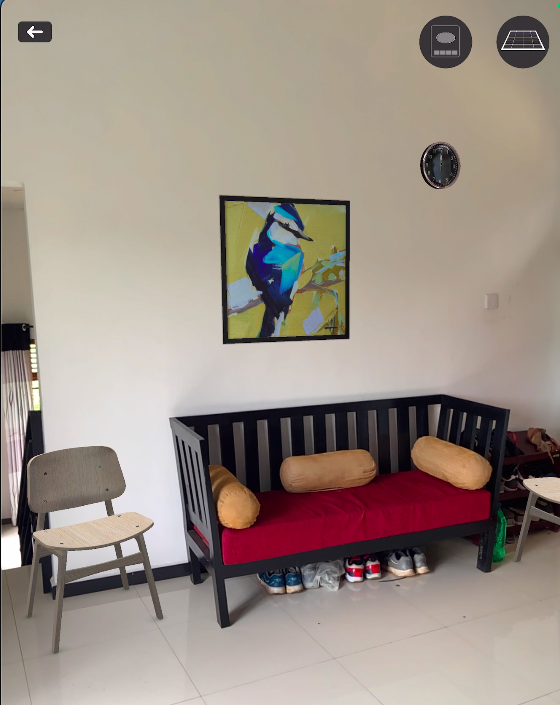
Multiple object placement uses both horizontal placement & vertical placement at the same time. From this demonstration users can place virtual objects on desired spots in a room or empty space that you have. In multiple placement demo users can place the same item several items & sametime users can place multiple objects. For the demo we have given you a golden elephant statue, wood chair, sofa, wall painting & clock. In each item set their placement as vertical placement item or horizontal placement item. According to them, the user can place them in identified planes. It doesn’t allow you to place a vertical placement object in horizontal planes or a horizontal placement object in vertical planes.
2.3. AR Measurement
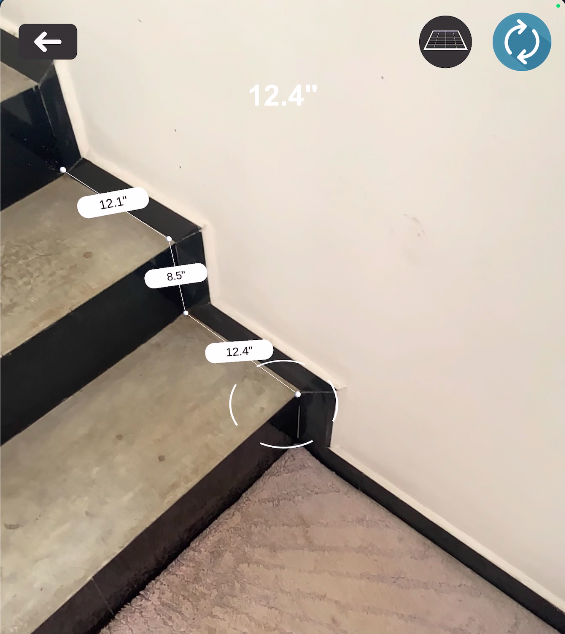
AR measurement allows users to measure length along horizontal or vertical space easily with use of AR technology. In each measurement it shows a card with value included line length & card rotate where mobile devices face.
2.4. AR Tilling
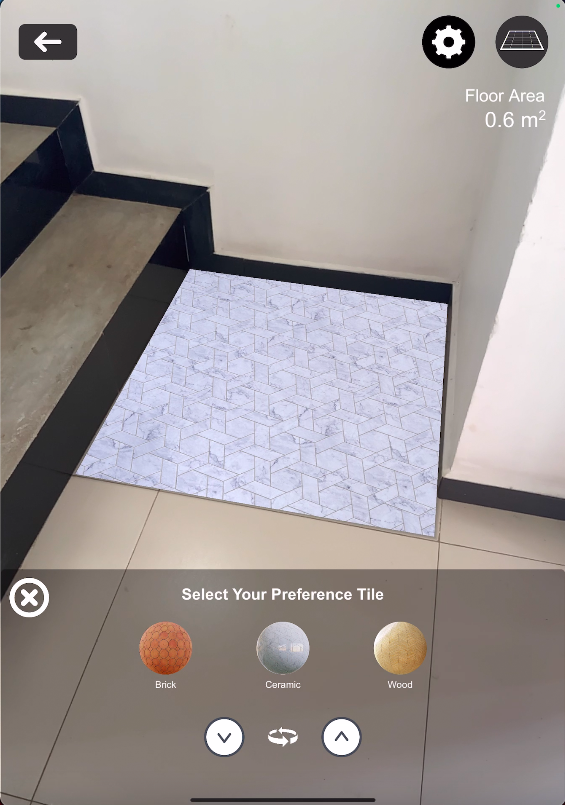
AR tilling is quite new as a use case & it's very easy to demonstrate to the user to choose the desired tile that they want through the AR. Users are able to mark the floor area by adding points & it generates mesh & applies tiles to mesh. Users can customize tiles tiling & offset value along with any direction. This can be used for marketing purposes in the field of interior designing, architecture & etc
2.5. Bonus Demos
At last Easy AR presents new bonus scenes with a newer version (2.0). The purpose of presenting this demo, we hope these demos can be used in many fields in AR such as construction, marketing, entertainment & etc.
2.5.1. AR water pump
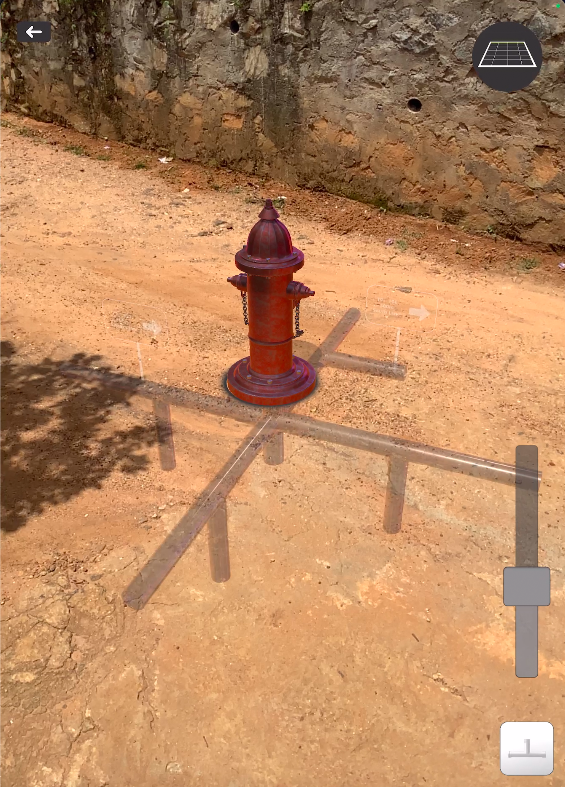
AR water pump showcases how users can see underground pipe systems connected to water pumps & adjust visibility of pipe systems. This demo is more appropriate in the construction field of AR.
2.5.2. AR pizza
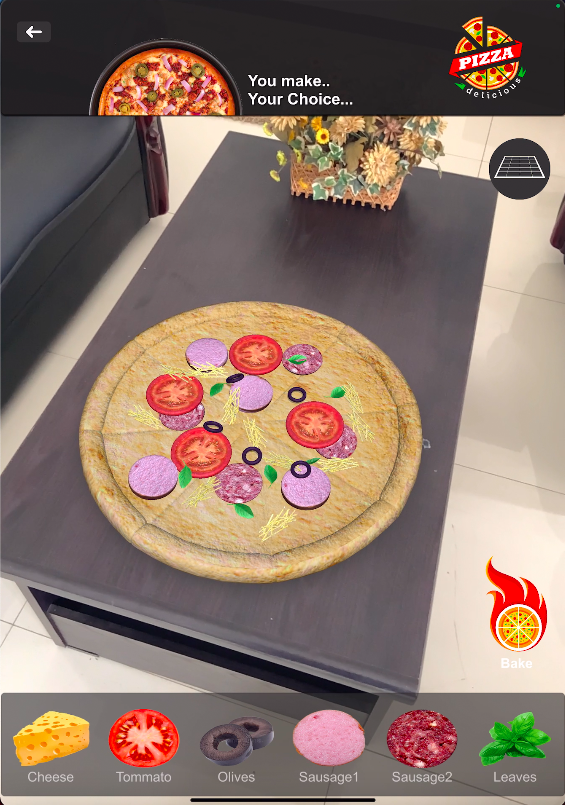
AR Pizza is a customizable product which customers can add toppings as much as they want. After adding the toppings, they can process the pizza. This will help pizza backers to identify the percentage of toppings preferred by customers before baking. For AR marketing purposes this demo is more appropriate.
2.5.3. AR Portal
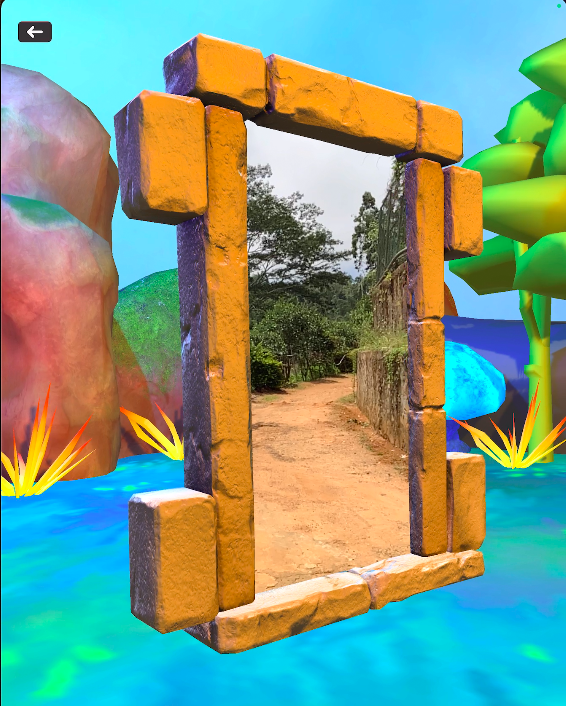
AR portal shows another fantasy world after the user passes through the portal. When a user stands inside the portal he/she can see that world as well as the real world through the portal entrance. This demo is suitable for the field of entertainment in Augmented Reality.
3. Import Easy AR package into Unity
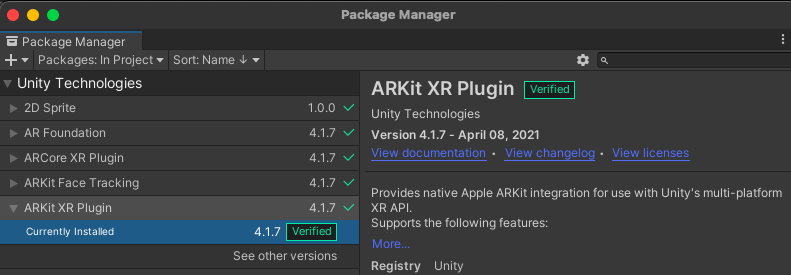
We highly recommend using Unity (LTS) verified versions. Initially we built the package using the following Unity version and used the AR Foundation package, ARCore XR Plugin and ARKit XR Plugin.
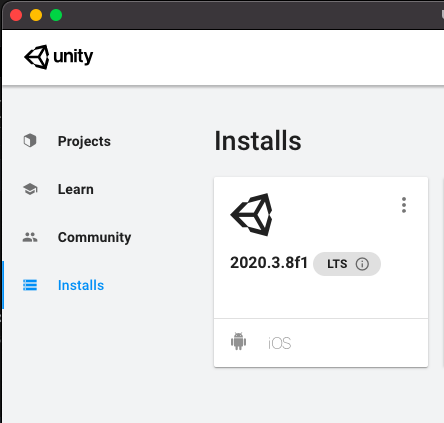
3.1. Unity Version
Unity 2020.3.8f1 (LTS)
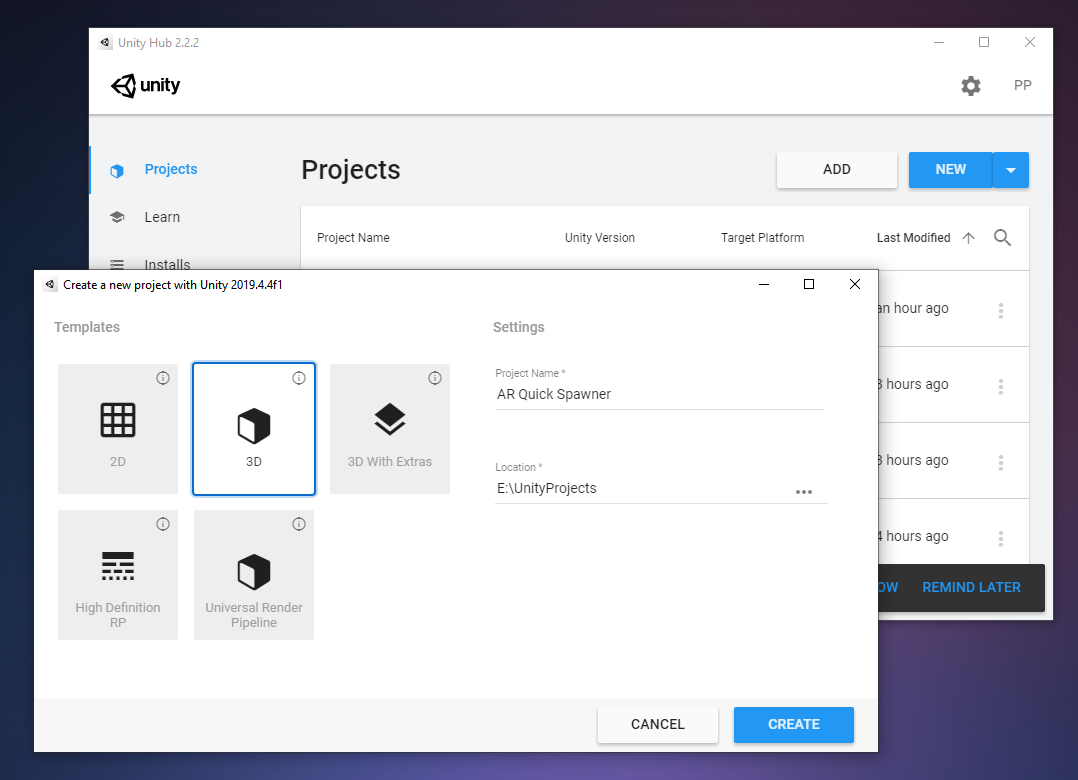
In the Unity hub, under the Installs tab you can add this verified version.
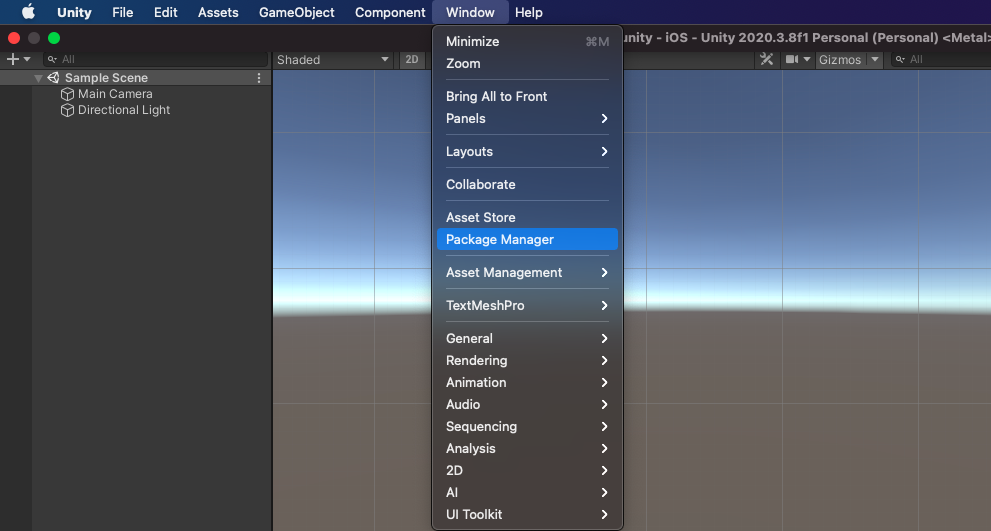
Go to the Window and open the Package Manager. Install the following packages into the project.
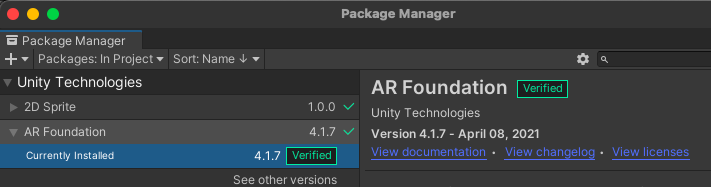
3.2. AR Foundation version
AR Foundation package 4.1.7
3.3. ARCore XR Plugin version
ARCore XR Plugin 4.1.7

3.4. ARKit XR Plugin version
ARKit XR Plugin 4.1.7
Setting up an Easy AR package.
4.1.Create a Unity LTS version empty project from Unity Hub and change Build Platform to either iOS or Android as desired.
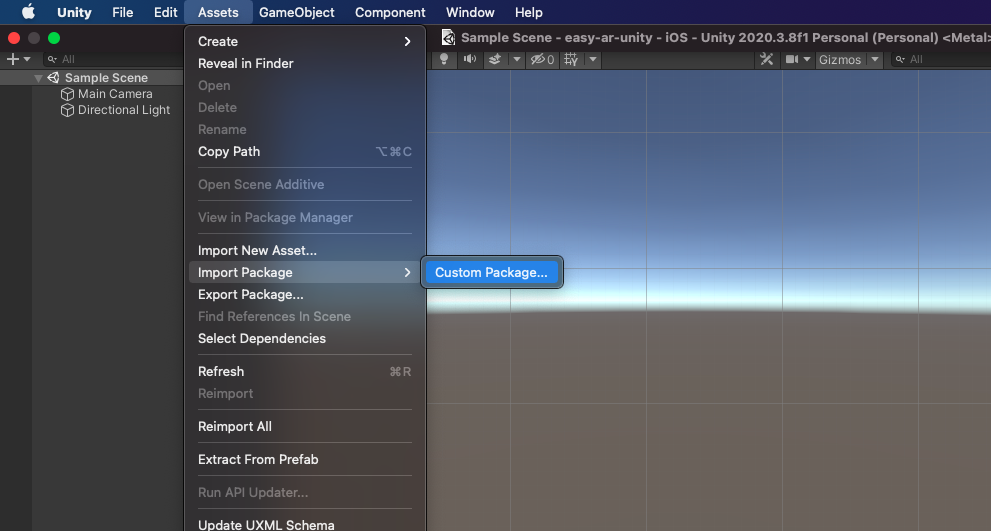
4.3.Import the Easy AR 2.0 package into the project.
Build the application
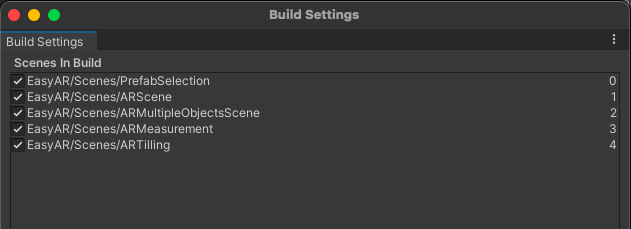
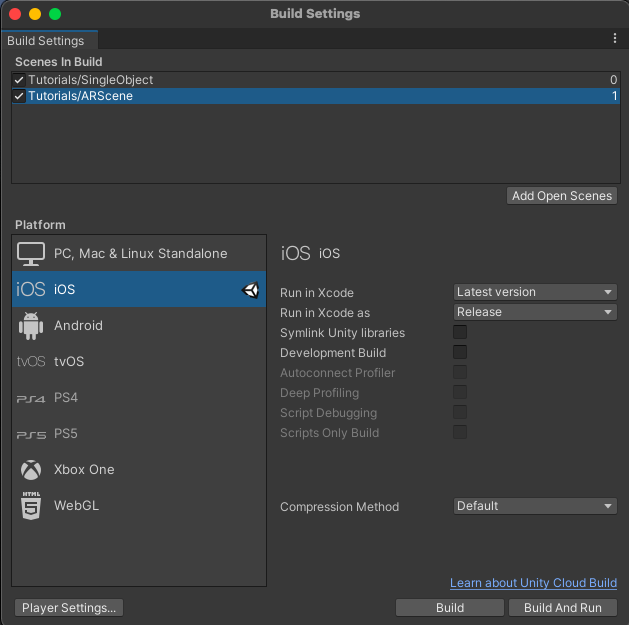
5.1.Go to File->Build settings

5.2.Go to EasyAR->Scenes folder and drag and drop the five scenes to build settings.
Build index order should be like below
0 - PrefabSelection
1 - ARScene
2 - ARMultipleObjectsScene
3 - ARMesurement
4 - ARTilling
5.3.Switch target Platform you desired to build either android or IOS.
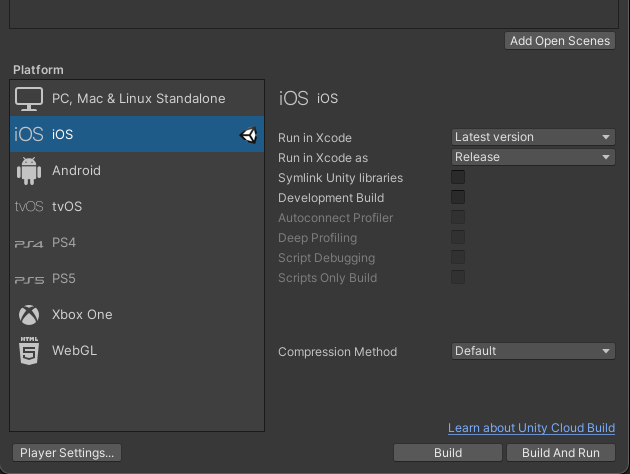
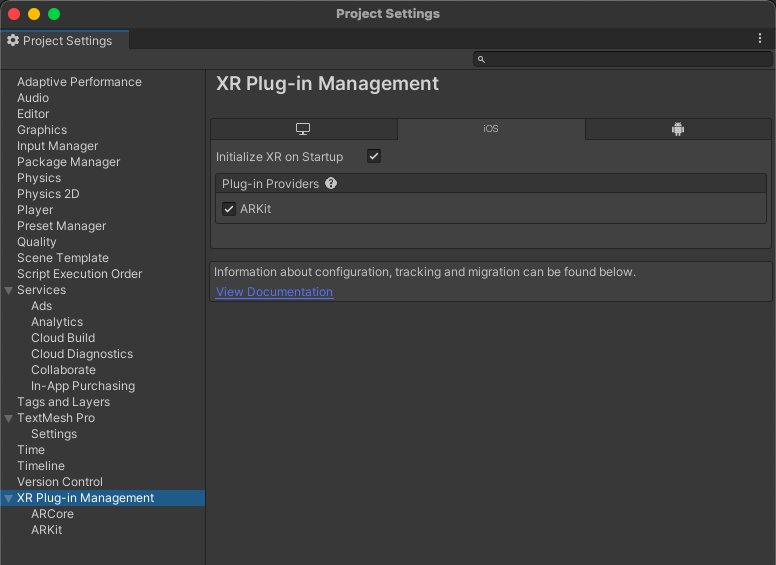
5.4. If your desired platform is iOS, switch the target platform to iOS. Go to Player setting -> XR Plug-in Management & go to IOS tab.Under plug in providers enable ARKIt.
5.5. Then Go to Player setting -> Player -> Other settings in the IOS tab.
Check under Identification below context are filled
bundle identifier -> com.companyName.productName
Camera usage description -> Use AR Camera
Location Usage description -> Use Location

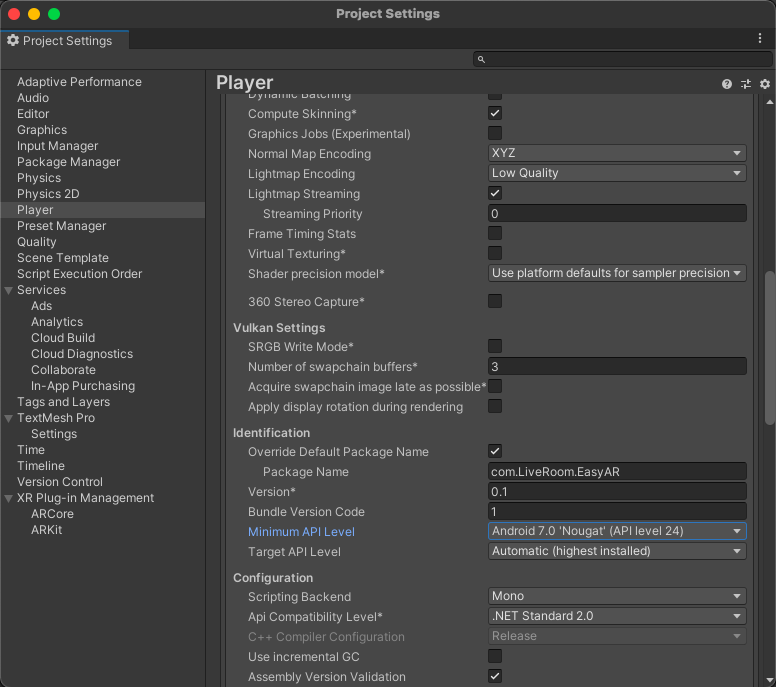
5.6. If your desired platform is android go to Edit > ProjectSettings > Player > Other Settings then set the android Minimum API level to API level 24 and remove Vulkan Graphic API
5.7. Here we go...now you can build the app by pressing the build button in the build setting.
Setting up a custom scene
6.1.How to set up a single object placement
This will guide you how to add a single object with easy manipulation (rotation/scaling/change position) into your project.
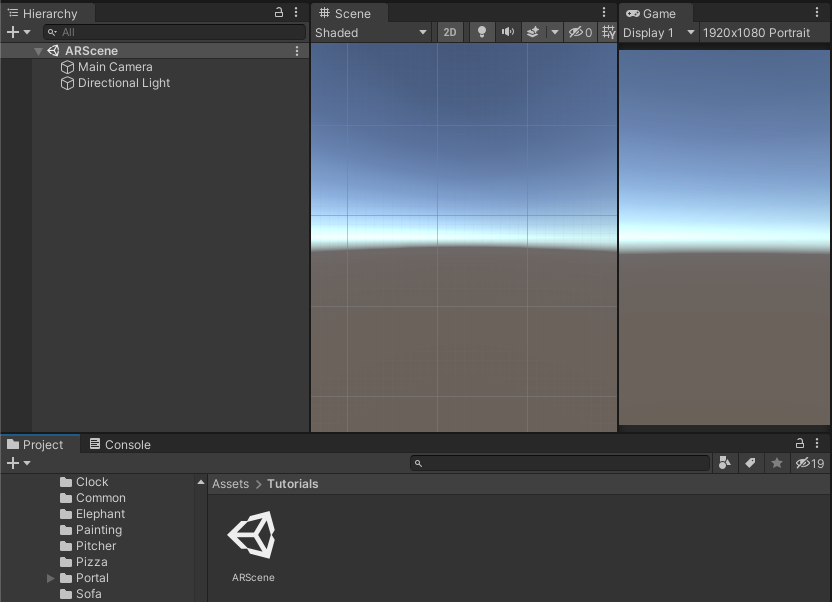
Step 1 : Create a new scene in the project window & name it as ARScene. Load the scene by double clicking on it.
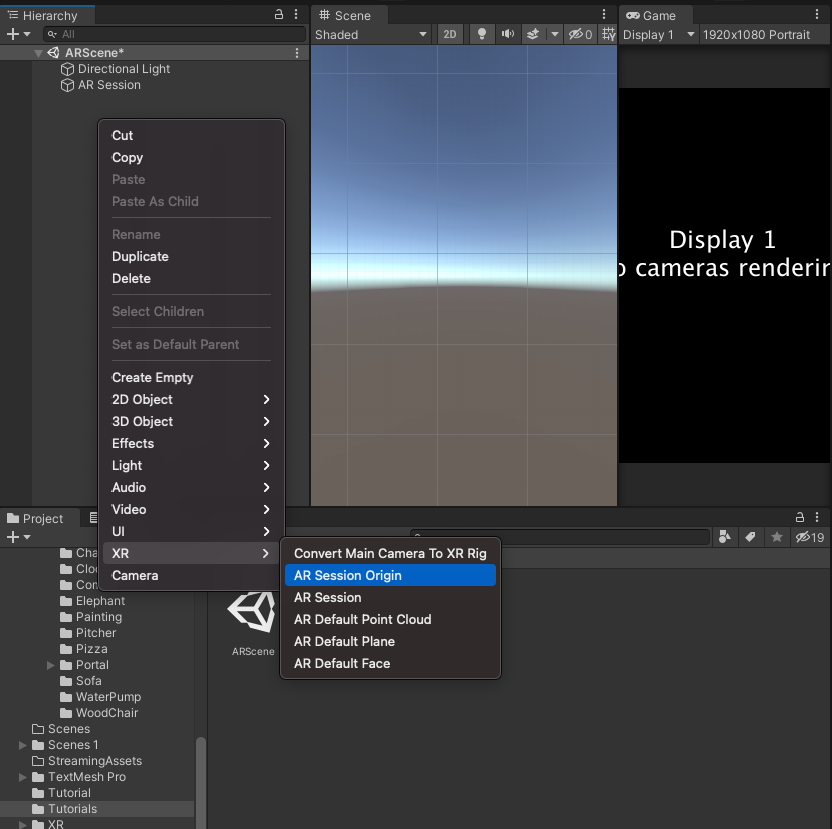
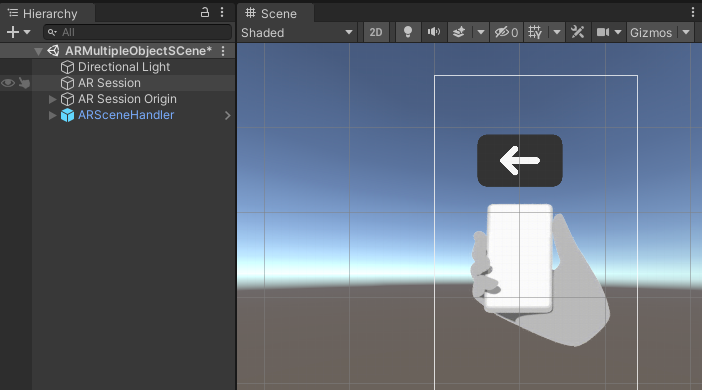
Step 2 : Delete main camera, right click on hierarchy, add AR Session & AR Session Origin by navigating XR->AR Session & XR->AR Session Origin. Change the AR Camera tag into MainCamera.
Step 3 : Click AR Session origin & Add initial data script & Place on Plane script to it. You can find these two scripts from the EasyAR->Scripts folder. Then you can see it will automatically add AR plane manager & AR Raycast manager Scripts.
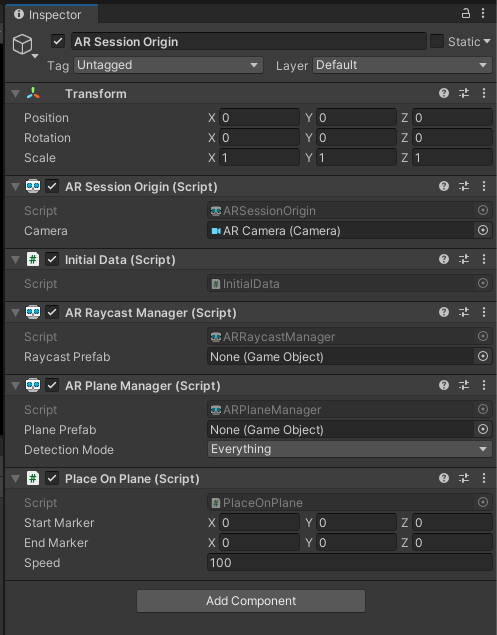
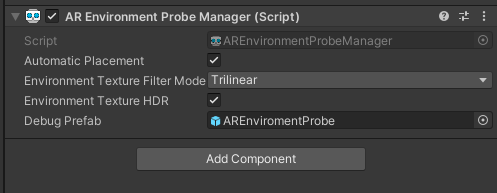
Step 4 : Next, in inspector of AR Session Origin, Click add component & add AR Environment Probe Manager to it. For Debug Prefab you can drag & drop the AREnvironmentprobe gameobject from the EasyAR->Prefabs folder.
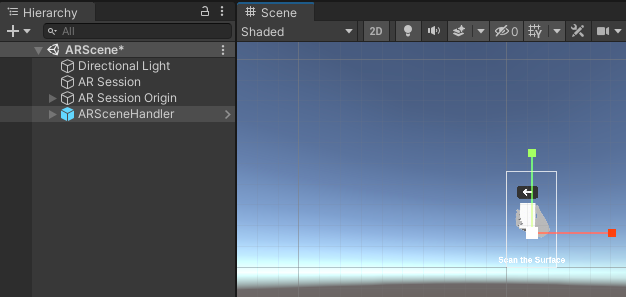
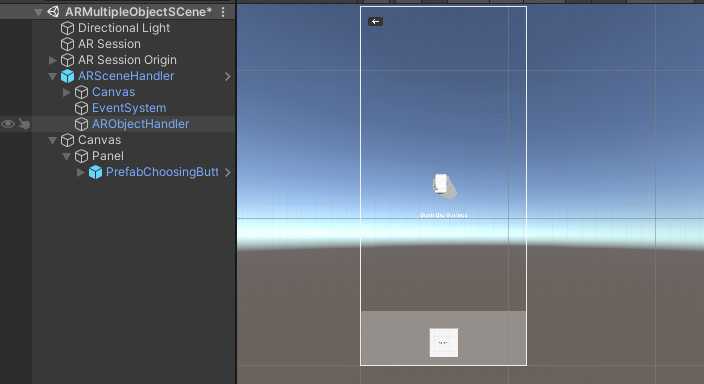
Step 5 : Go to the EasyAR->Prefabs folder & find ARSceneHandler prefab. Drag & drop it into the game hierarchy.
Step 6 : Create another Unity scene to choose prefab using a button to place prefab in the AR view. (Ex: SingleObj Scene)
Step 7 : First we should create our spawning object prefab. Drag & drop a game object that you want to spawn to hierarchy. (For example we take cube). Reset the transform & scale down to 0.2 x,y,z respectively. Drag & drop cube to prefab folder & delete from hierarchy.
Step 8: Go to the cube prefab by double clicking on it. Every object includes 3 game objects. Those are indicator, World Space Canvas & Shadow Plane.
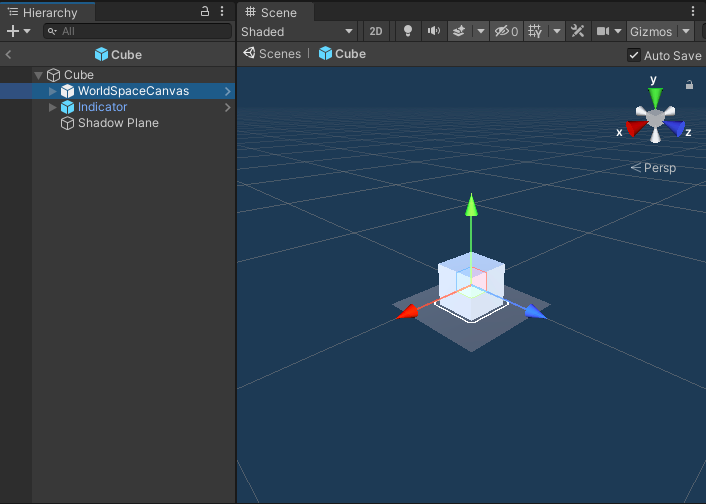
World space canvas responsible for showing spawning objects 2d view before AR object spawning. You can find this prefab from the EasyAR->Prefabs folder. Drag & drop WorldSpaceCanvas prefab as a child of the spawning object.
Indicator Responsible for show on plane where game object spawning at. You have to adjust the indicator closest to the plane position after dropping as a child of the game object.
Shadow plane shows a nice contact shadow of the game object. As explained in section 6.4, you can generate your own contact shadow for spawning objects & place as a child in the prefab hierarchy.
Step 9 : After adding the above mentioned game objects to the prefab, select the prefab (ex: cube) , drag & drop the Spawning Object Details script to it.
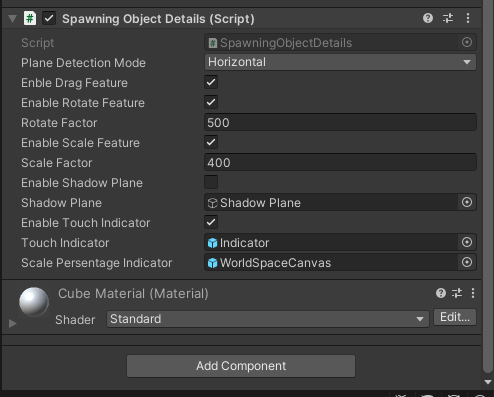
Step 10 : Change Plane Detection Mode to Horizontal or Vertical depending on the default plane they spawn. (Ex: Cube is normally placed in horizontal planes & Clock placed in vertical planes). Drag & drop shadow plane from prefab hierarchy to Shadow plane game object. Likewise drag & drop Indicator & World space canvas from prefab hierarchy to relevant game objects in the Spawning object details component.
(Make sure your main prefab (spawning object) includes a collider, because all the touch gestures are taken as input due to this collider. If not please attach box collider or relevant collider to gameobject)
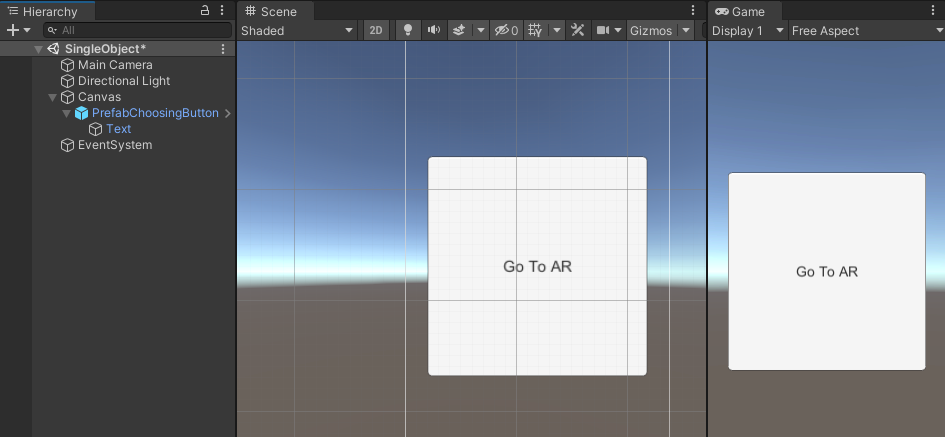
Step 11 : Back to the scene (SingleObject scene). Add a Canvas to the hierarchy and put the PrefabChoosingButton prefab as a child in Canvas from the EasyAR->prefabs folder. This button is responsible for navigating the user from the main screen to AR view scene. You can add an image of a 3D object which you are going to spawn to this button as a sprite.
Step 12 : Select PrefabChoosingButton prefab & go to Inspector. Under the onclick function, you can find settings gameobject added as a new event.
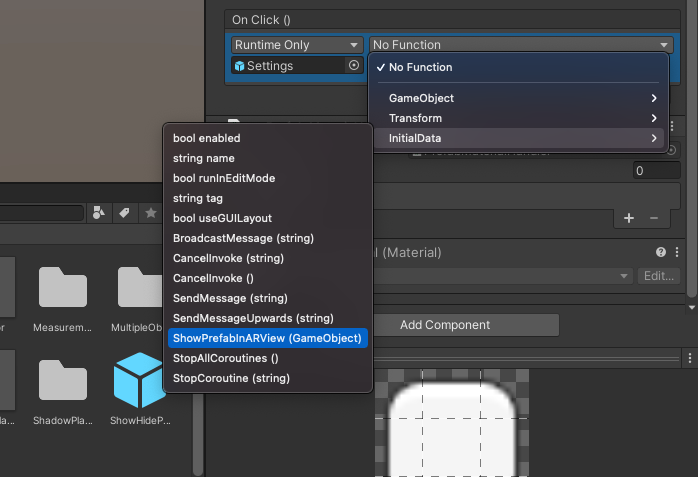
Step 13 : Same time It will ask the game object as a parameter in the ShowPrefabARView function. You can give a prefab (cube) that we built above as a spawning object here. (For example We put a cube prefab which we want to spawn here.)
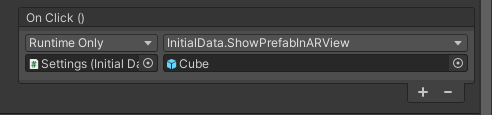
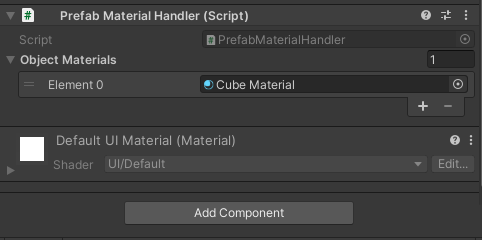
Step 14 : Next, drag & drop the prefab material handler script from EasyAR->Scripts folder into Button’s Inspector. Set material count of spawning objects & select materials for element. (For example we added one material & put cube material in to element 0)
Step 15 : Now you are ready to build the project. Go to the build setting, remove all scenes if any have & add 2 scenes(SingleObject & ARScene ) which we created now. Choose the build platform IOS or Android & Build.
6.2. How to set up the Multiple Object Placement
The Initial setup looks similar to single object placement you need to follow
First five steps in section 6.1. (Refer Step1-5 in Section 6.1)
The only thing you need to change here is remove placeonplane.cs from AR Session Origin & replace MultipleObjectPlacement.cs file from EasyAR->Scripts folder.
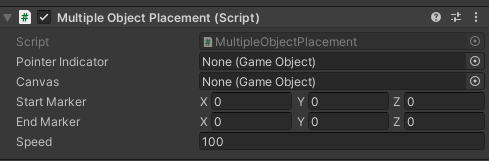
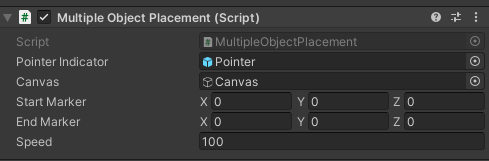
For a pointer indicator you can add the pointer prefab from the EasyAR->Prefabs folder. For Canvas you need to create new canvas in game hierarchy and drag & drop in to Canvas game object in MultipleObjetctPlacement.cs
In hierarchy goto newly created Canvas & Add new panel. Add prefabChoosingButton prefab as a child object in the panel.
This one prefabChoosingButton prefab is responsible for showing one AR object. You can add multiple prefabChoosingButton prefabs as you want as a child object of the panel. Click prefabChoosingButton & go to the inspector.
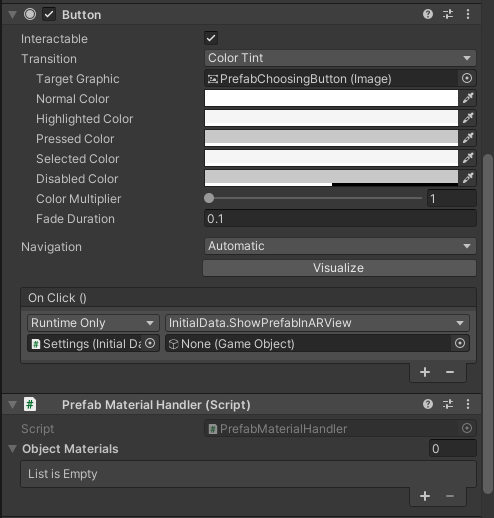
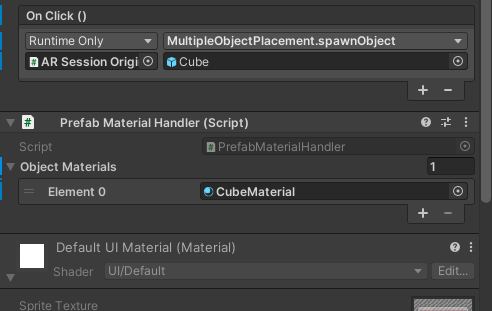
Under the Onclick function it has already added Settings gameobject. Remove it & Add new -> drag & drop AR Session Origin game object from Hierarchy.
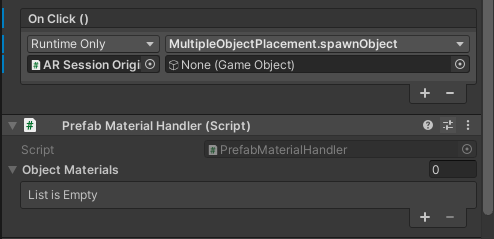
Select MultipleObjectPlacement script & spawnObject method. You can drag & drop the game object prefab that you want to spawn here. Same time you can add a number of prefab materials & add materials to list in Prefab Material Handler Script.
Make sure when you create a Spawning object prefab should follow the same steps in steps followed at single object placement developed. (Refer step 7-10 in section 6.1)
Navigate to Canvas again in hierarchy. Add a notification panel as a child of canvas. You can find the notification panel prefab from the EasyAR->Prefabs folder. This panel is responsible for showing error messages if a user tries to place a vertical placement object in Horizontal planes or horizontal placement objects placed in a vertical plane.
Yes you reach the final step. Go to the build setting & choose your preferred platform & build.

Things you need to consider before building the project.
Make sure AR camera tag name set as Main camera
Make sure you add the notification panel & tag name is set as NotificationPanel.
Make sure all spawning objects prefabs include relevant gameobjects discussed in step 7-10 in section 6.1.
Make sure all spawning objects include colliders
6.3. How to set up the AR tilling
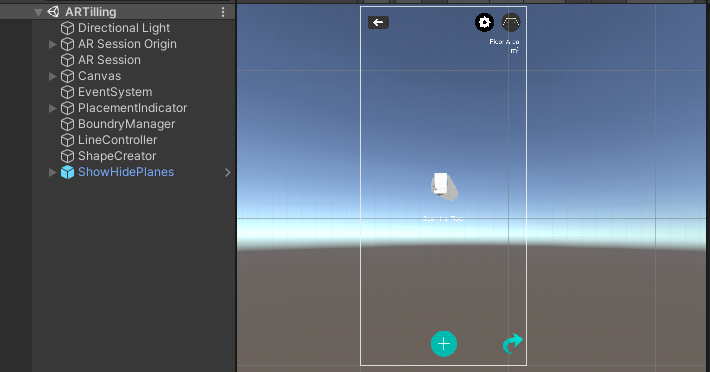
For AR Tilling we have given you a demo scene named AR Tilling. The scene can be found in the EasyAR->Scenes folder. From here we are going to add or modify existing tiles in the scene.
First you need to open the scene named AR Tilling. You can see the hierarchy shown below.
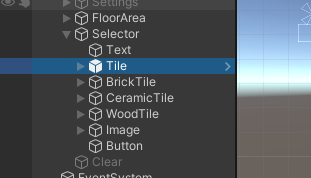
The tile changing scenario happens inside the canvas. Expand the canvas & enable selecter gameobject (by default this gameobject disabled). Now you can expand the selector also.
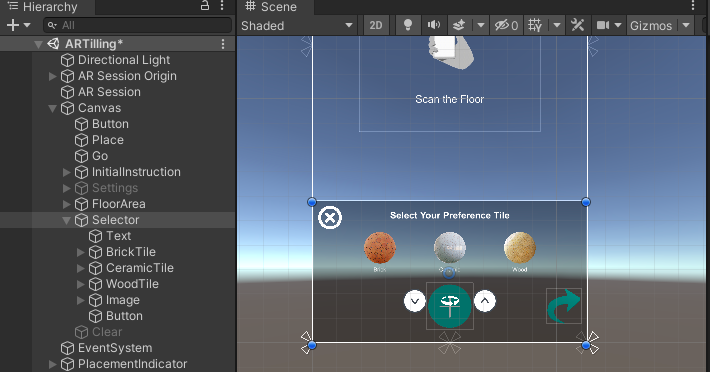
As an example shows we added 3 different tiles named Brick Tile, Ceramic Tile & Wood Tile. These are simply buttons. Click one button & check the inspector.
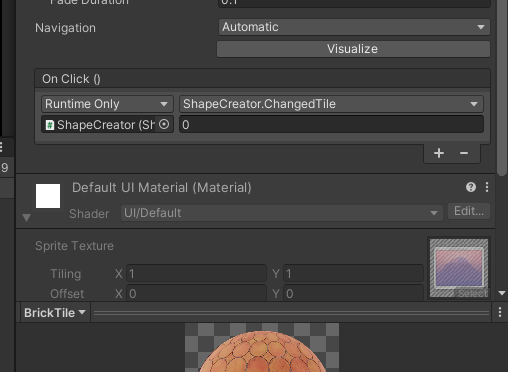
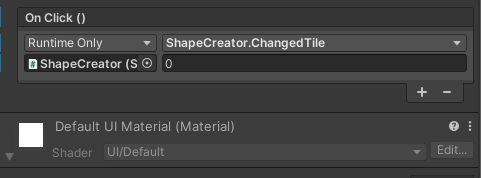
You can see, the button onclick function called shape creator game object’s change tile method. Shape creator gameobject can be found in the game hierarchy.
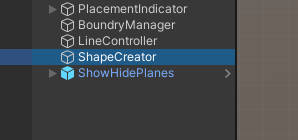
Click shape creator gameobject & see inspector.
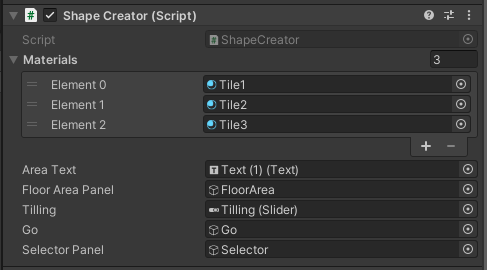
You can see in Shape Creator we added 3 tile materials. If you need to modify material, simply you can change the material you want here. If you add new material, set materials count & set the materials.
If you add new materials, you should have the same count of buttons in the selector. For custom buttons, you can drag & drop the tile prefab as a child of the selector from the EasyAR->Prefabs folder.
Then select the tile prefab. Go to the inspector & click + button under the onclick method. Drag & drop shape creator game object to it & set ShapeCreator->changedTile method.
Finally you can give the exact material element number here taken by the materials element in Shape Creator.
You are Ready to build now..Go to the build setting. Change the build platform & build.
6.4. Shadow map generation
Easy AR 2.0 gives you a new scene for shadow map generation of 3d objects in unity editor. We can use default shadows projection by directional light. But sometimes shadow took hard & random patterns. But after research we found a better way to implement a contact shadow map similar to IOS usdz shadow. So you can create your own smooth shadow map for 3d models using Easy AR 2.0. You are guided in this section, how to build this contact shadow.
First you move to the ShadowBake scene in the EasyAR->Scenes folder.
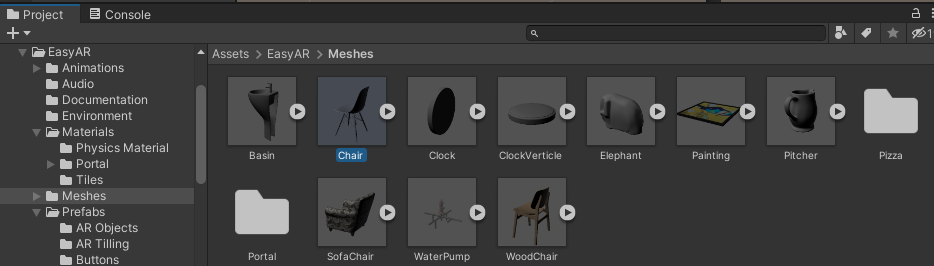
Hope you added your 3d model to the EasyAR->Meshes folder. For example we take our chair model to generate contact shadow.
Drag & drop 3d model (chair) to child of DragTheObjectAsChild game object in hierarchy.
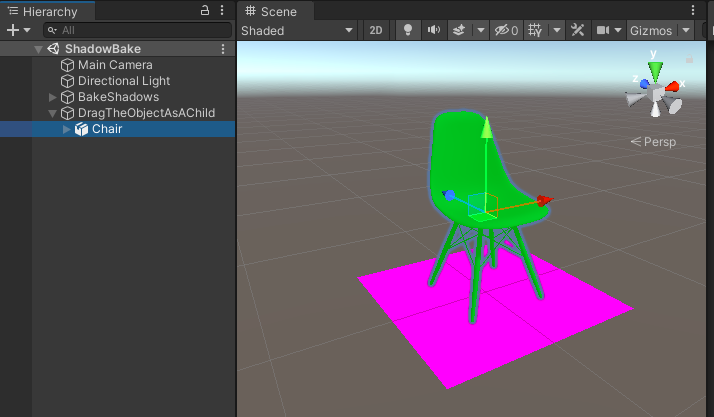
Then click the 3d model (chair) & go to the inspector. Check the static block of the 3d model.
Select BackShadows gameobject & go to inspector. Under General Lighting Script there is a button called Generate shadow. Click that button.
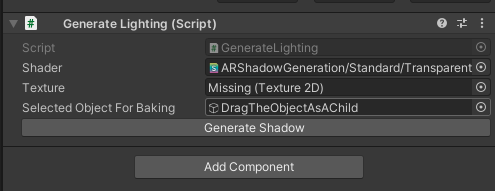
You can see the process will generate a smooth contact shadow after a few seconds.
Now you can collect this contact shadow prefab in the EasyAR->Prefabs->ShadowPlanes folder. Here Chair142157_Shadow is our newly created shadow map.
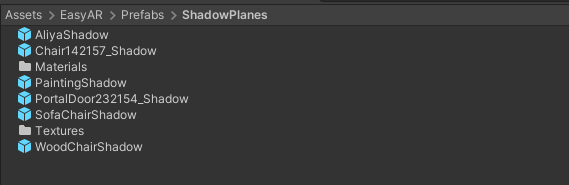
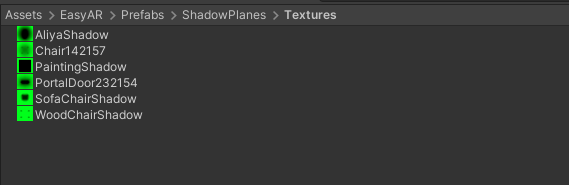
In the Materials folder you can find that contact shadow’s material & Textures folder texture of contact shadow with same name as prefab saved.

Now you can add this contact shadow to your gameobject prefab. Select the 3d model prefab (chair prefab) & put it as a child of 3d model prefab.
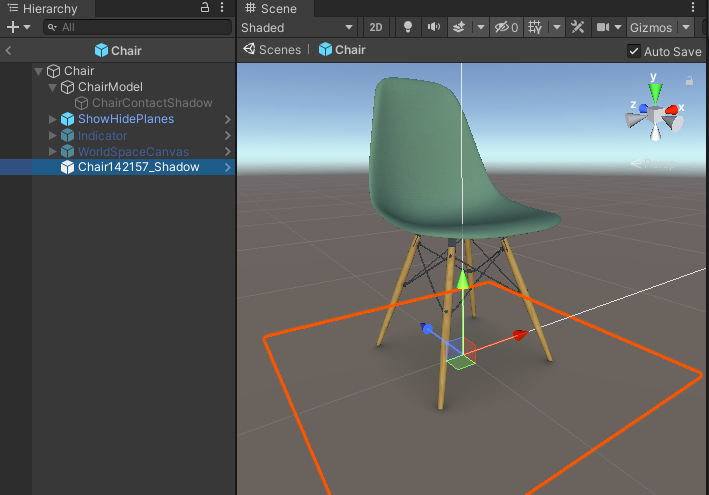
You can see the smooth contact shadow like this..Enjoy.